Spread Hdmi
This document was uploaded by user and they confirmed that they have the permission to share it. If you are author or own the copyright of this book, please report to us by using this DMCA report form. Report DMCA
Overview
Download & View Spread Hdmi as PDF for free.
More details
- Words: 2,637
- Pages: 17
Spread HDMI Manual
-1
High Definition Multiple Indentity First let me say thank you for downloading this, I’ve been working on it a little while. This is a new wave of offense that I have created, it has all the spread offense feel but with a lot more diversity. This offense needs playmakers in order to work, plain and simple. Secondly you need balance as far as plays not yardage, like 20 rushing plays and 20 passing plays. Thirdly you need to be innovative in your play calling, run out of pass formations and pass out of run formations. As the game changes you need to change and attack. This offense is not a take what the defense gives you it attacks and makes the defense respect every single player on the offense. I will touch on all these topics and more in the following pages. Lets talk about playbook selection.
Playbook choice is very important, you need to be able to create balance out of the multiple formations. If you play 1 dimensional this offense will fail. Playbook choices that are good for this are Arkansas, Louisville, Oklahoma State , and my favorite Ole Miss. It is all in preference here tinker with each one until you find the one that you like. Here is Ole Miss’s playbook, http://ll100.ea.com/cem/u/f/GPO/easports.com/ncaa09/playbooks/Ole%20Miss/Ole%20Miss.pdf Personal Key is a QB with some mobility say 80 or up speed rating, 85 or up Throw Power and close to 90 Throw Acc. HB is another key to this offense must have at least 90 speed and agility plus must be able to catch the ball. The WR’s must be able to run the ball and catch the ball,1 very quick WR is a must, but for the other WR speed is not important here good hands and route running. They must be able to run the jet sweeps and motion option plays. You want a big quick TE with good hands and decent speed.
Zone/Man Recognition
This is one of the biggest part of the spread HDMI, reason being is that you can come out look over the defense and make sure that you are in the right play before you snap the ball. Because of this you need to pick your play in the huddle in under 5 seconds and get to the LOS. You need at least 15-20 seconds to look over the opponents unbalanced formations are a big part of this. Your first read should be man or zone. This is a relatively easy read to make based on where the defender lines up on your guys. I do not like to motion to see what type of coverage the opponent is running because this tips your hand, everyone knows what you are trying to do by manually motioning a receiver across the formation. This why I like to use unbalanced sets a lot. This is an example of an unbalanced set. Notice TE, WR 3, and WR 1 all to the right of the formation.
First zone is a cover 3. Curl-Flats is the cover 3 zone killer, Also attacking the deep middle seams on either side if the safety. How do you tell if it is cover 3 I watch the safeties to see how they move. If the I see one dropping deep middle I know its cover 3 This is a 4-3 cover 3
The 2 corners cover deep 1/3 and the FS covers deep middle. The seams between the CB and Safety is vunerable, the underneath drag routes and the curl flat routes especially to the right because the LB has to cover flats while the CB drops. Keys to reading the cover 3 1 Safety will drop deep middle CB’s will drop deep 1/3rds You now know where and how to read a cover 3, which is important the next step is to know where you are going with the ball. All reads must be made within 2 seconds and you have to know who you will be throwing the ball to. Best way to explain this is by examples. You have to know your routes pre-snap, this is a must. Knowing routes will allow you to look at your first, second and third reads quickly, especially in a blitz situation. I will post some patterns now and tell you what my reads are in a cover 3 zone.
I will look X,B,A I already know that LB will run into the deep safety so I eliminate him.
B,A LB and X will get covered up
LB,X,A then B. B will find a soft spot in the zone if the other 3 options are covered Those are 3 examples of typical cover 3 reads. Next is the Cover 2 zone, this defense is usually played to stop passes to the flats and deep fade routes. Beating this zone is easy especially in NCAA 09. Cover 2 consists of CB’s that will sit in the flats, the safeties will cover the deep ½’s and the LB’s will cover hook zone. It will look something like this. 4-3 Normal
This defense has the same weaknesses which is the deep middle and the area right after the corner and before the safety. To be able to read a cover 2 watch the safeties again they will both drop to the deep 1/2s. Then make a quick read on the corners if they sit its cover 2 now you need to attack the area that is soft here are some examples.
Y,B,A. I will not even mess with X to risky. I like B to be my second read because if Y gets covered up manually B will clear the CB and be in that soft area so it’s a nice touch pass to him
On this play if I read cover 2 X is my man. Then I will look A,B
A,B,Y These are just some examples of my cover 2 reads Lets talk about man coverage now or cover 0 or cover 1. There are a lot of man type coverages and a lot of them are accompanied with some type of blitz, which could be a problem if not read quickly. Your basic cover looks like this
4-3 Normal
Man coverage all around and 1 safety plays hook zone while the other will play deep middle. This defense is very weak in this game and if someone is going to run this on you, you must take advantage of it. The defenders will tip there hand if they are playing man you must watch for it. Against my base formation of ace slot, the defense would line up like this in man.
The LB’s will widen out to play up on the slot receiver this is an example of a man coverage. Here is the thing if you read man you need to hit the out or slant route. If you have a speedy WR and you see that he is locked in man coverage I would try going over the top to him.
A few man reads for you
X,LB,A,B
A,LB,X,B Please keep in mind that all of these reads are to get the ball out of your hand quickly. There are many instances during a game were you can hold the ball the extra second and hit a bigger play downfield but unfortunately I can not teach you that in this manual that is something that you have to feel during the game. Alright that’s the basic read section we can now move on to play calling and formation selection. Defensive Blitzing
If the defense wants to blitz you that will be there mistake because of all your play makers and how you are going to get the ball to them. Blitzing leaves holes in the defense and you need to recognize them and attack. A blitz like this
Has a lot of weaknesses problem is seeing it in game. You can see the soft spots when it is in play art like this but seeing it in a game is different. When you read blitz first thing is to ask yourself if it is man or zone. The majority of what you are going to see is zone blitzing. If they are crazy enough to man blitz you will see it pre snap and hit an out or slant route for big yardage. When you see a zone blitz lineman will drop into coverage and LB or safeties will blitz. This is to create confusion for the line and the QB. The biggest trick is to stay in the pocket, I know it is tough to do but you have to in order to beat it. You are most protected when you stay in the pocket and will have the most time to find an open guy. About 75% of zone blitzes have a soft spots in the flats. Know this that once you hit your hot read in the flats once or twice your opponent will adjust to try to take this away if they do then more then likely you will need to hit something over the middle. I would adjust with a blitz like this.
Because of the flat protection problem is I would leave the middle open. When it comes to zone blitzes bottom line is just read your safeties they will still tell you what type of coverage you are dealing with. Look for openings from the vacating blitzer and hit it for big yardage. Blitzes are easy to diagnose just go into practice mode and try this out you will see that it really is easy. Sit in the pocket and make your throw.
Play-Calling and Formation selection. This is very tough to teach through a manual but I will do my best. The spread HDMI is meant to have a lot of diversity. What I try to do is be able to RUN AND PASS out of every single formation in my playbook also I like to show my opponent every single formation in my playbook. What good is your offense going to be if you run the same formation every single play? Not a good one I play a lot of people online that use that same formation and while it may work for a while, I can eventually shut it down. Your base formation is the Ace Slot or Ace Y-trips which you will be in 30% of the time. Your run/pass% should be 50/50 out of this formation.
Why you may be asking? Its easy, the unbalanced formation allows for easily determining what type of coverage you will be facing. That’s reason 1, reason 2 is that for some reason people have trouble playing a 3 WR, 1TE, 1 RB offense. Some people play Nickel, others play Dime, and some will play 4-3,3-3-5, 3-4 etc. This gives you an advantage by seeing how they package against it will help your play calling a lot. If they choose to play Dime, then you run the ball, if they want to play there base D (4-3,3-4 etc.) then you throw the ball. You need to be paying close attention to how people play this formation as your play-calling from here on out will be affected by it. It is important to mix your formations up throughout a drive, as long as you show 5 or more formations per drive they will be off-balanced.
The next big formation to show during a game is the I-form Normal
I will generally run this formation about 15 to 20% of the time and I will throw out of it 80% of the time. As long as you have decent WR that can beat man coverage and find holes in the zones you can throw out of the I effectively. This is a change up most people will crowd the line against a I form, I’m sure do to. That is all the more reason to throw out of it. No one will expect it. Alright now for the next 3 formations, these 3 I show about 15% of the time. The run pass ratio should be about 50/50.
Next formation is used 30% of the time and it is anything out of the shotgun here are some of my favorite formations from the gun.
Those are my 3 favorite shotgun formations. Keep in mind that you want to keep the
run/pass percentage around 65/35. Yes you want to run more out of the gun then throw. Alright the last 5 to 10% formation packages I mix in everything else. There are 5 other formations that fall into this category. The 1 formation that I try to get at least 3 to 5 plays out of during the game is the Wildcat. I love this formation because all of the package subs gives you a lot of gimmicks out of it. The one thing I will say is DO NOT over use it. It is good to run 3 to 5 times a game in critical situations like 3rd and short or on the goal line.
Since this is a spread type of offense remember 30% of your plays are out of the gun. The other 30 are out of ace slot and so on just like I said above. The other part of this offense is being able to move players around through the use of package subs. WR at HB, WR at FB, HB2 slot, these are just a few examples of all of the package subs in this playbook. You must use them to get the ball to your playmakers.
Play Makers
Alright every team has them it’s your job to get the ball to them and this offense allows that to happen I will use Penn State as my example because they are my team. Darryl Clark- QB Evan Royster -HB Stephon Green -HB Derrick Williams-WR Deon Butler-WR These guys are my playmakers I will make sure that each gets his share of touches. I like to get them “touches” because the common conception is that a HB will run the ball and a WR will catch the ball. I try to ruin this by running with my WR and passing to my HB. I use package subs to put Green in the slot and hit a quick out or slant same goes for Royster. I will package sub Williams in at HB and toss it to him or motion him out of the backfield and pass it to him. I will run some option with Clark and have Williams at HB or motion Butler into the backfield for a option out of the gun. These are my examples of how I use everyone on the field keep in mind that there are a lot more then just these examples but I will leave that up to you. As far as how many touches Royster will run the ball 15 times and catch 3 to 5 balls. Green will get 5 to 10 touches a game, as will Butler. Williams being that he is my best player will get 15 touches at least. As far as Clark goes I design at least 5 running plays to him a game and he does all my passing of course. These are examples that I have put up for you just as an example some teams will have less play makers but before you start your game you need to designate at least 3. There it is the spread HDMI in a nutshell. Keep in mind I have given you the basics to make this offense work you will have to make the adjustments that you need to, to make this offense truly deadly. Any questions feel free to PM me or hit me up on PSN whitepony99
Related Documents

Spread Hdmi
April 2020 15
Hdmi
May 2020 10
Hdmi
November 2019 11
Jvc Hdmi
May 2020 10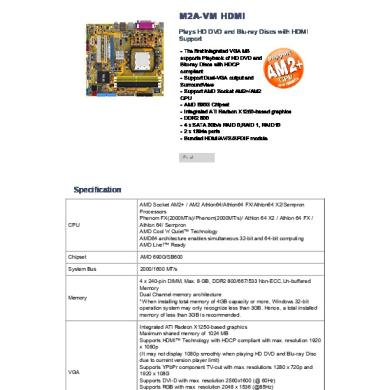
M2a-vm Hdmi
October 2019 8
Spread Sheet
June 2020 17More Documents from ""

Basic Coverage And Route S
April 2020 3