02 Gram Stain
This document was uploaded by user and they confirmed that they have the permission to share it. If you are author or own the copyright of this book, please report to us by using this DMCA report form. Report DMCA
Overview
Download & View 02 Gram Stain as PDF for free.
More details
- Words: 891
- Pages: 3
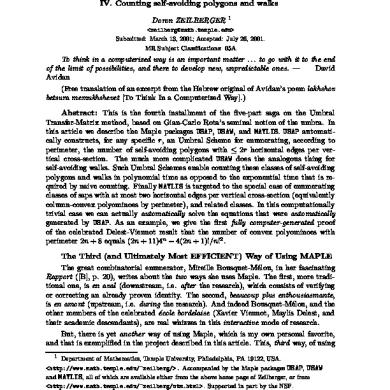
Lab 2: Gram Stain Background: Bacterial cells are translucent so staining is required to make them more visible under the microscope. There are many techniques which will visualize bacterial cells under a microscope. However, a Gram stain is an example of a differential stain which can differentiate between two types of bacteria as well as visualize the bacteria. The Gram stain is able to differentiate cells into two classes (Gram positive or Gram negative) based on the structure of their cell walls. Two dyes are used in a Gram stain, a primary dye (Crystal Violet) and a counter stain (Safranin). The primary dye is basic; therefore it is positively charge and interacts with the negatively charged cell wall. After the primary stain is applied a mordant (Gram’s Iodine) is added. A mordant facilitates further interactions between the primary dye and the cell wall. The mordant used in a Gram stain crystallizes the dye that has penetrated the microbe. Gram positive and Gram negative bacteria are able to be differentiated due to differences in their peptidoglycan layer. Gram positive cells have a larger and more highly cross-linked peptidoglycan which contains smaller pores. The smaller pores enable Gram positive cells to retain the primary dye (Crystal Violet, a purple dye) when the samples are washed with alcohol. Gram negative cells do not possess the thick peptidoglycan layer and therefore have larger pores. Hence, they cannot retain the primary dye and become colorless after being washed with alcohol. Gram negative bacteria are re-colorized using a counter stain (Safranin, a red dye). Due to the cell wall properties of each type of cell Gram positive bacteria will be purple and Gram negative bacteria will be red/pink after performing the Gram stain. Gram staining is usually the first and most important step in identifying bacteria; therefore, you will be expected to memorize the procedure.
Figure 2.1
1
Guidelines: • The dyes you will be working with are very potent and will stain your clothes as well as your skin. Be careful with the dye and wear latex gloves if you don’t want dye getting on your skin • Do not overheat the slide when heat-fixing. Excessive heat can destroy the cells and make it impossible to identify them. • Do not over decolorize with the alcohol. If you leave the ethanol on for too long the Gram positive cells may decolorize causing misidentification of the bacteria. • The time lengths given for dyeing and decolorizing are approximate and may need to be varied depending on your results. • After each use of the oil immersion lens use the lens paper to wipe the oil off of the lens.
Materials: • •
• • • • • • • •
Microscope Slide Samples of the bacteria to be Gram stained: o Bacillus subtilis o Staphylococcus epidermidis o Escherichia coli Crystal Violet Gram’s Iodine Ethanol Safranin Wash Bottle filled with water Mineral Oil (for oil immersion lens) Bibulous Paper Lens Paper
Procedure: •
Prepare a Gram stain 1) Using an inoculating loop prepare smears of the bacteria by spreading a thin suspension of each bacteria on a glass slide 2) Heat-fix the smears by passing them through the Bunsen burner flame a few times. 3) Place the slides on the staining rack. 4) Cover the smears with the primary dye, crystal violet, and let it stand for 30 seconds. 5) Rinse the slides with water for 5 seconds. 6) Apply the mordant, Gram’s Iodine, by covering the smears and let it stand for 1 minute. 2
7) Rinse the slides with water for 5 seconds. 8) Decolorize with ethanol for 15-30 seconds. Add the ethanol slowly until the crystal violet no longer floats up from the slide. Be careful not to decolorize for too long. 9) Rinse the slides with water for 5 seconds. 10) Cover the smears with the counter stain, safranin, and let stand for 1 minute. 11) Rinse the slides with water for 5 seconds. 12) Blot dry using the bibulous paper. 13) Place slide on the stage of the microscope. 14) View your specimen under the microscope under each of the objective lenses (4x, 10x, 40x, and 100x). NOTE: Before using the oil immersion lens oil must be applied to the slide: Move the 40x objective lens out of position so that no objective lenses are over the specimen. Place a drop of oil directly on the slide where you were viewing the specimen. Move the 100x oil immersion objective lens into position. Use the fine adjustment knob to bring your specimen into focus. 15) Record what you see under the oil immersion lens for each species of bacteria in your notebook. Be sure to clean the oil off of the lens after every use with lens paper.
Critical Thinking: 1) Suppose you Gram stained a sample from a pure culture and observed a field of red and purple cocci. Adjacent cells were not always the same color. What do you conclude?
2) Suppose you are viewing a Gram stained field of red rods and purple cocci through the microscope. What do you conclude?
3) Since you can't identify bacteria from a Gram stain, why might a physician perform a Gram stain on a sample before prescribing an antibiotic?
4) If you Gram stained human cells, what would happen?
3
Related Documents

Gram Stain
June 2020 20
02 Gram Stain
June 2020 10
Stain Removal
June 2020 20
Gram A Ti Gram As
June 2020 14
Tincion Gram
May 2020 9
Alumni Gram
May 2020 18More Documents from ""
Lab Guide Book
June 2020 17
Deserts
June 2020 15
02 Gram Stain
June 2020 10